|
|
| mrfunji
|
| Newbie |
 |
| Group: Members |
| Posts: 0 |
| Member No.: 197 |
Car Profile: Available
|
| Status: Offline |
|
|
|
|
|
|
| Posted:Apr 12 2003, 06:38 AM |
|
|
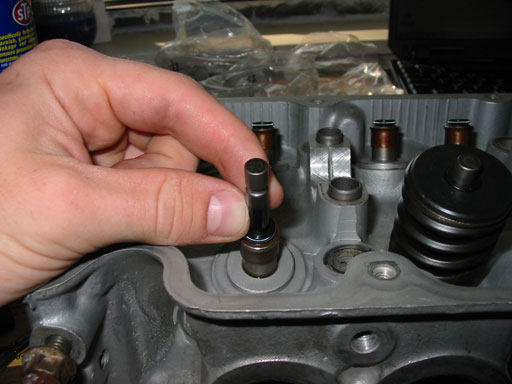
Installing valve seals
Ok, now to putting everything back together. Make sure you throughly clean everything first. Try to get all the carbon out, bring it to a machine shop and have them hot tanked, or buy some decarbonizer and scrape it off. I recommend cleaning the valves and the cylinder head. If you need to grind the valves, make sure you use valve grinding compound.
The valve seals are tricky to install.
Take the seal, make sure it's on the guide straight and then take a socket (i used a 12 mm one because it was just big enough to clear the rubber so it was pushing on the metal) and a hammer and bang it down. You can hear a difference in sound when it's all the way down. When you do, take the hammer and bang around the rim of socket just to make sure, and then look down the guide to see if you can notice a gap between the top of the guide and the bottom of the seal.
Attached Image
|
| mrfunji
|
| Newbie |
|
| Group: Members |
| Posts: 0 |
| Member No.: 197 |
Car Profile: Available
|
| Status: Offline |
|
|
|
|
|
|
| Posted:Apr 12 2003, 06:38 AM |
|
|
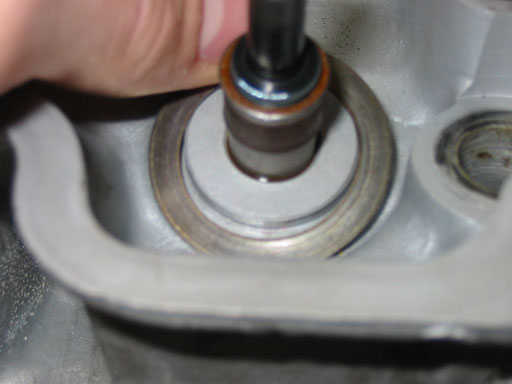
Install valve
now, take one of the baggies with the valve components in them. Might want to start with exhaust #1 or intake #1 just for reference. Make sure you put them back in the spot labeled on the bag.
To install the valve, just push the stem in the bottom of the guide and push, it should come out the top
Attached Image
|
| mrfunji
|
| Newbie |
|
| Group: Members |
| Posts: 0 |
| Member No.: 197 |
Car Profile: Available
|
| Status: Offline |
|
|
|
|
|
|
| Posted:Apr 12 2003, 06:39 AM |
|
|
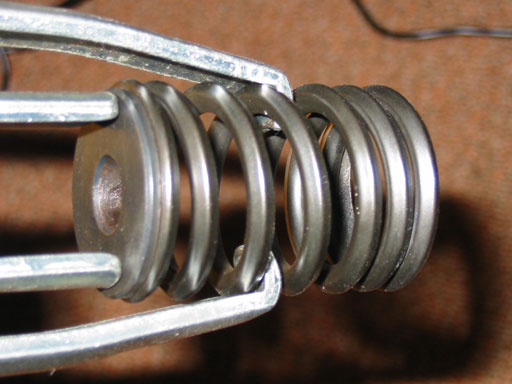
Install shim
Next is the shim. I dunno what it's really called, it's just a thin metal peice at the bottom of the spring. It just goes there real easy.
Attached Image
|
| mrfunji
|
| Newbie |
|
| Group: Members |
| Posts: 0 |
| Member No.: 197 |
Car Profile: Available
|
| Status: Offline |
|
|
|
|
|
|
| Posted:Apr 12 2003, 06:40 AM |
|
|
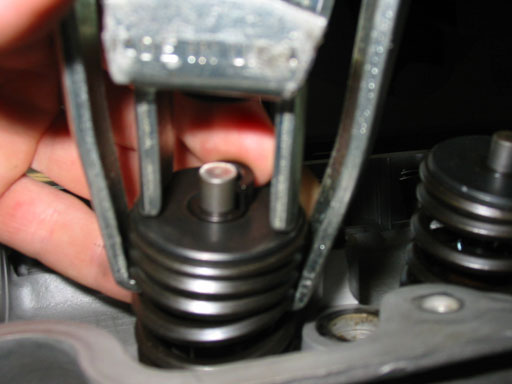
Compress valve spring
Before you compress it, you might want to check the lenght. It should be around 2" i think. Usually if your car has like 150,000 miles the springs will have sagged a little anyways, but I didn't really care since I don't have enough $ to get new ones.
Put the spring in the compressor, with that little black top on. The part of the spring that touches the cylinder head is more condensed with the spring coils
Attached Image
|
| mrfunji
|
| Newbie |
|
| Group: Members |
| Posts: 0 |
| Member No.: 197 |
Car Profile: Available
|
| Status: Offline |
|
|
|
|
|
|
| Posted:Apr 12 2003, 06:41 AM |
|
|
Install retainers
Just put the spring over the top of the valve. It should be low enough for you to slide the retainers in.
The bumb on the retainer half fits into the groove on the valve. This part is kind of tricky, cuz they are small like to fall out of your fingers.
Try to get one half in there, then keep it in place by pulling the compressor up. Then put the second one in there and press it down and move the compressor down too. Once it pops in, pull the compressor up again to lock them in. Then, slowly release the compressor making sure the spring seats well.
Attached Image
|
| mrfunji
|
| Newbie |
|
| Group: Members |
| Posts: 0 |
| Member No.: 197 |
Car Profile: Available
|
| Status: Offline |
|
|
|
|
|
|
| Posted:Apr 12 2003, 06:42 AM |
|
|
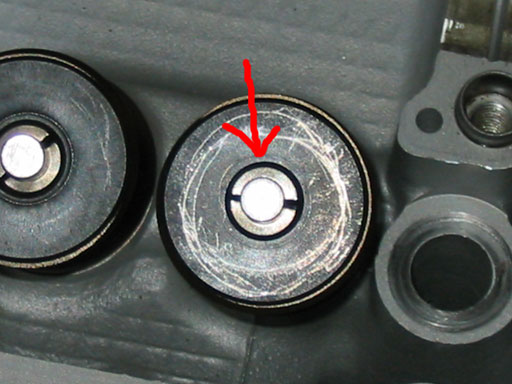
Installed Retainer
Top view of installed retainer. The camera make it look like my thing is scratched real bad but it's not.
Attached Image
|
| mrfunji
|
| Newbie |
|
| Group: Members |
| Posts: 0 |
| Member No.: 197 |
Car Profile: Available
|
| Status: Offline |
|
|
|
|
|
|
| Posted:Apr 12 2003, 06:43 AM |
|
|
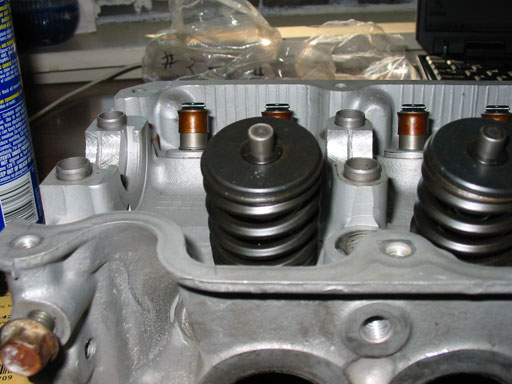
Done
This is what you should have just done. Now repeat it for the next 11 valves!
Attached Image
|
| mrfunji
|
| Newbie |
|
| Group: Members |
| Posts: 0 |
| Member No.: 197 |
Car Profile: Available
|
| Status: Offline |
|
|
|
|
|
|
| Posted:Apr 12 2003, 06:44 AM |
|
|
The rest of the assembly is kind of a no-brainer. The camshaft drops right in. When you put in the camshaft put some Assembly Lube (I used Lucas Oil Heavy Duty Stabalizer) around the cam bearings (not the lobes that touch the rocker arms, the part that goes under the bearing caps.)
Then the rocker arm assembly is next. Before bolting it down, take out the HLAs, fill them with oil. To fill an HLA with oil, take a paperclip and press on the ball on the backside of the HLA and squeeze it. Oil should squirt out. Now, with the HLA still squeezed, dunk it in some clean engine oil and let it expand. Then, fill the HLA hole in the rocker arm up and slowly press the HLA into place. Oil should squirt out of the top bulb on the rocker arm. If it doesn't, your didn't clean the passeges well enought. Torque in a 2 step sequence to 13-20 ft lbs in the following sequence. Make sure all the rocker arms and plastic things are clear of the bearing caps so it bolts down correctly.
10 6 2 3 7
09 5 1 4 8
The front housing bolts on after, 13-20 ft lbs on those bolts, and the cam sproket is 35-48 ft lbs.
I don't have any pictures cuz my hands were covered in oil and I wasn't about to touch my camera. That about concludes the head rebuild. Hope everything went well! |
| John626
|
| Newbie |
|
| Group: Members |
| Posts: 11 |
| Member No.: 2046 |
Car Profile: Available
|
| Status: Offline |
|
|
|
|
 |
|
| Posted:Apr 15 2005, 01:25 PM |
|
|
Great article mrfunji  ...... the photos are extremely interesting ! ...... the photos are extremely interesting ! |
|
|
| Posted:Oct 10 2005, 12:49 AM |
|
|
great article gives me ideas of something to do with my head
--------------------
L|V3 F45T, D|3 5|d3W4Y5! |
| shadow
|
| Newbie |
|
| Group: Members |
| Posts: 2 |
| Member No.: 4011 |
|
|
| Status: Offline |
|
|
|
|
|
|
| Posted:Mar 17 2006, 11:06 PM |
|
|
| CODE | Thank You for the Info-It is efford much appreciated.
I wonder, When building a Turbo charged engine to handle Medium to high Boost,
Is it better to convert your head from HLA to solid lifters ?
I take HLA is Hydraulic Lifters.
Thanks
Shadow |
|